
Getting a website online may be a new experience for some of you. There’s a lot to understand when first starting out and to some it can be a frustrating experience. Nonetheless, you figure it all out and purchase a domain name, order web hosting, and get your website online…
Let’s fast forward a bit! You’ve been online for half a year creating pages, publishing new posts, and listing products on your site. Your site is a nicely oiled machine that’s growing steadily and you couldn’t be happier. However, in your attempts to further optimize your site you begin to notice that your site’s load time may have increased (bad) and the amount of disk space you’re using on your account is growing rapidly.
Many new website owners tend to forget about or have not been educated on the topic of resizing and saving images for the web. It’s easy to search Google or Freepik for an image, upload it to your site, and place it inside a post or page. Because you did not resize this image you quickly realize that this particular image loads very slowly in the browser..very similar to watching blinds being slowly lowered down a window. Is there something wrong with your web host’s server? Is your internet connection taking a dive? What’s going on?!
You begin to research online and search for things such as, “why is my site loading slow” or “how to optimize my website for Google” or “how to speed up my website“. These are all valid concerns to have. It’s great you’re curious and have begun this process of researching. You’ll quickly notice that many blogs, forums, and sites will suggest that you test your site with the following tools:
Optimize Your Images For the Web
We’d like to emphasize the importance of optimizing and saving your images for the web. If practiced correctly you may (probably will) see an improvement in your site’s speed. Why do we stress this topic so strongly? We’ve seen many of our customers with content dating as far back to 10+ years ago. This is an extreme example, but having 10 years of content can surely add up in the amount of space that customer needs.
Let’s talk about a blogger who has 500 posts with 5 images inside of each blog post. For this article’s example, we’ll say that this blogger uploaded very large images with a dimension of 1920×1200 and each of those 5 images were 5MB in size. This blogger uses 25MB of space by inserting 5 images into each blog post. In ten years of blog posts that’s 12.5GB of space these images now consume on the server!
To recap this scenario:
# of Blog Posts: 500
# of Images in Each Post: 5
Size of Each Image: 5MB
Dimension of Images: 1920×1200
Total Disk Space Usage: 12.5GB
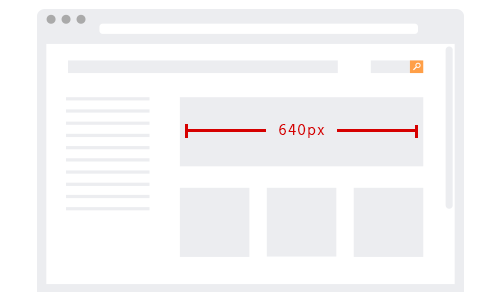
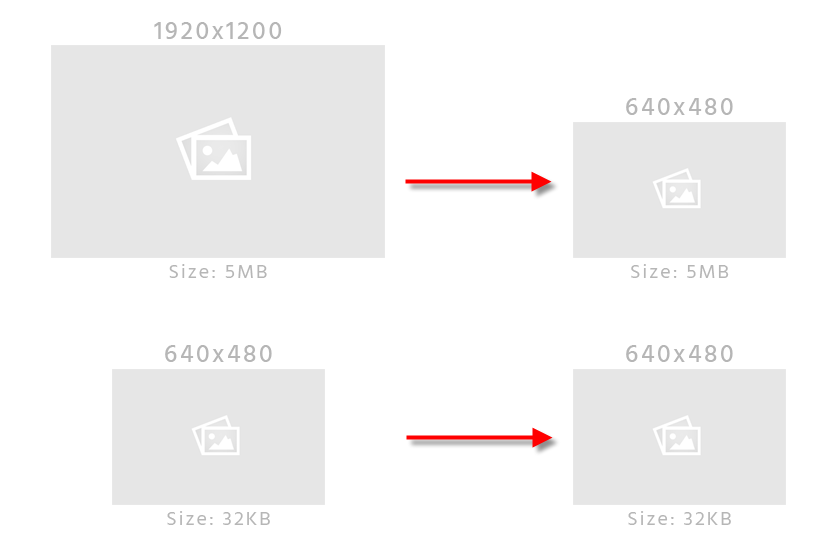
Now, let’s take a look at the site. The site’s content area for pages and blog supports a width of 640px. There’s no need to upload images with a width of 1920px unless you’re someone such as a photographer showcasing hi-res images on your site for visitors to enlarge and view at the original size of 1920×1200.
Most templates or themes will display the 1920×1200 large images with a max width of 640px instead. Essentially, the large 1920×1200 image is shrunk to fit the display area of 640px (width) without actually being resized to a smaller dimension or decreasing the actual size of the image from 5MB.
Meaning, if you took the absolute URL path to that image and pasted it into your browser, that image would still load in the new browser tab with the dimensions 1920×1200 at 5MB in size.
To re-size images for the web you’ll want to use a photo editing program such as Photoshop. If you don’t have Photoshop you could always use an online browser editor called Pixlr, which is very similar to Photoshop. Open an image and navigate to image > image size to resize the image. Make sure Constrain proportions is also checked. In Photoshop, you can save for web by pressing ALT + SHIFT + CTRL + S. Saving an image for web will strip “invisible” data contained within the photo such as EXIF metadata. This data increases the size of the image because it stores information on the image such as when the image was shot, camera details, and shot details.
If you’ve re-sized your image down from 1920×1200 to 640×480 using a photo editor such as Photoshop or Pixlr, but still need to compress the image further (to reduce it’s file size–the amount of disk space it will require to be stored) you can use a popular tool, Kraken.io.
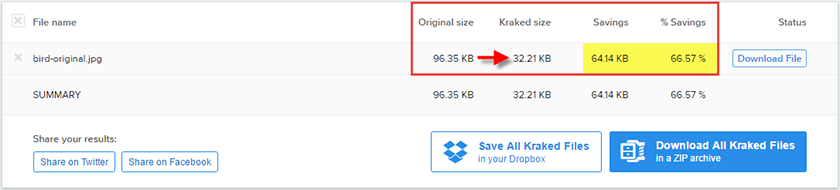
I have taken the original image shown below and let Kraken.io use lossless compression techniques to reduce the overall image size by 67%. The idea behind saving an image for the web and using lossless compression techniques is to reduce the size of the image while, at the same time, retaining the image’s quality.
 |
 |
As you’ll notice there’s a significant reduction in the size of the original image. In this example, we’re using very small images that are only KBs in size. These efforts will pay off in the long run for both disk space usage and bandwidth usage on your account when you use this technique on larger images.
If you have any questions on how to save your images for the web and optimize your website using this technique leave a comment down below or contact support. We hope this article has helped educate you further on this topic and understand the importance of image optimization techniques to help improve your website’s performance.