Enabling GZIP compression helps you to optimize your site for better performance by decreasing the loading time of your pages. In this article we’ll explain to you what GZIP compression is, how to enable GZIP compression in your .htaccess or nginx.conf. and check if GZIP compression is working for your site. GZIP is enabled by default on all of PeoplesHost’s servers.
- What is GZIP Compression?
- Enable GZIP Compression Using .htaccess
- Enable GZIP Compression on NGINX Webserver
- How to Check the Response Header
- Check GZIP Compression Tool
1. What is GZIP Compression?
GZIP is a method used to make your site’s files smaller by compressing them. This allows your server to deliver these (smaller) files to a site visitor much more quickly. In more technical terms, a browser supports the content-encoding: gzip response header. We’ll show you how to check this response header inside of your browser later in this post.
Using compression allows a site visitor to make a request and receive that request in a much smaller file size than they normally would without GZIP compression enabled. Thus, improving that visitor’s experience by serving content faster.
2. How to Enable GZIP Using .htaccess
Chances are your hosting account is on an Apache server environment, which means you’ll have access to the .htaccess file. The .htaccess is a hidden file that is used to control important aspects of your site. We highly recommend creating a backup of your .htaccess (downloading a copy) before making any changes to your file. Inserting incorrect code into your .htaccess may result in your site going offline.
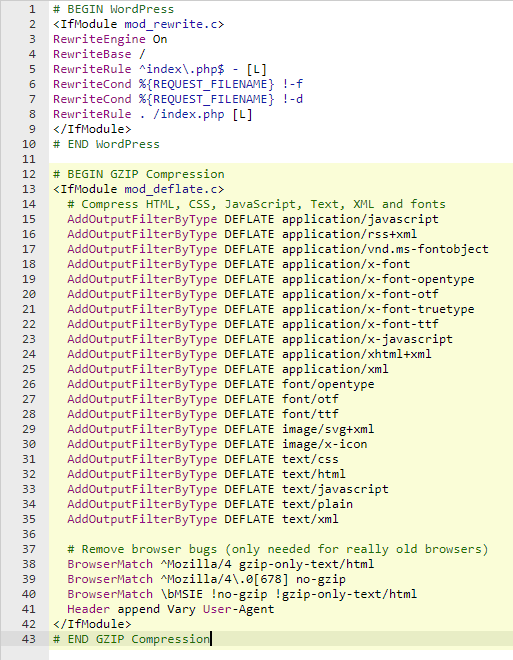
Here is the code to insert into your .htaccess to enable GZIP Compression. Please follow the steps below this code if you are unsure on how to insert this code into your .htaccess.
# BEGIN GZIP Compression

  # Compress HTML, CSS, JavaScript, Text, XML and fonts
  AddOutputFilterByType DEFLATE application/javascript
  AddOutputFilterByType DEFLATE application/rss+xml
  AddOutputFilterByType DEFLATE application/vnd.ms-fontobject
  AddOutputFilterByType DEFLATE application/x-font
  AddOutputFilterByType DEFLATE application/x-font-opentype
  AddOutputFilterByType DEFLATE application/x-font-otf
  AddOutputFilterByType DEFLATE application/x-font-truetype
  AddOutputFilterByType DEFLATE application/x-font-ttf
  AddOutputFilterByType DEFLATE application/x-javascript
  AddOutputFilterByType DEFLATE application/xhtml+xml
  AddOutputFilterByType DEFLATE application/xml
  AddOutputFilterByType DEFLATE font/opentype
  AddOutputFilterByType DEFLATE font/otf
  AddOutputFilterByType DEFLATE font/ttf
  AddOutputFilterByType DEFLATE image/svg+xml
  AddOutputFilterByType DEFLATE image/x-icon
  AddOutputFilterByType DEFLATE text/css
  AddOutputFilterByType DEFLATE text/html
  AddOutputFilterByType DEFLATE text/javascript
  AddOutputFilterByType DEFLATE text/plain
  AddOutputFilterByType DEFLATE text/xml

  # Remove browser bugs (only needed for really old browsers)
  BrowserMatch ^Mozilla/4 gzip-only-text/html
  BrowserMatch ^Mozilla/4\.0[678] no-gzip
  BrowserMatch \bMSIE !no-gzip !gzip-only-text/html
  Header append Vary User-Agent

# END GZIP Compression
Follow these steps to access your .htaccess and insert the code to enable GZIP Compression:
You’ll need to log into cPanel and access the File Manager

Click the Settings button located in the top right, select the Show Hidden Files (dotfiles), and click Save. Refresh File Manager and you should see the .htaccess file appear.


Insert the GZIP Compression code inside of your .htaccess such as the image below and hit the Save Changes button after doing so.
3. How to Enable GZIP Compression on NGINX Webserver
Enabling GZIP Compression on an NGINX webserver will require you to add the following code to your nginx.conf file.
gzip on;
gzip_comp_level 2;
gzip_http_version 1.0;
gzip_proxied any;
gzip_min_length 1100;
gzip_buffers 16 8k;
gzip_types text/plain text/html text/css application/x-javascript text/xml application/xml application/xml+rss text/javascript;

# Disable for IE < 6 because there are some known problems
gzip_disable "MSIE [1-6].(?!.*SV1)";

# Add a vary header for downstream proxies to avoid sending cached gzipped files to IE6
gzip_vary on;
4. How to Check the Response Header
After inserting the correct lines of code to either your .htacces or nginx.conf you can check the content-encoding: gzip response header inside of your browser. In this example, we’re going to use Chrome to check the response headers.
To check the response header inside of Chrome you’ll want to navigate to your site. Hit CTRL + SHIFT + I (Windows) or CMD + OPTION + I (Mac). Alternatively, you can right click anywhere on the page and click the Inspect option. Click the Network tab in the Developer Tools screen.
Refresh your browser with Developer Tools open and you should see a bunch of items load in the Network tab Developer Tools screen. Scroll to the top and click the first request in the list (your domain name). In this example, we’re clicking www.peopleshost.com. When this is done, your screen will be split into two. On the right, you’ll now see a Headers tab where you’ll be able to check the content-encoding.


5. Check GZIP Compression Tool
If you are still unsure whether or not GZIP is enabled on your webserver and for your site, you can use a handy third-party tool Check GZIP Compression – https://www.websiteplanet.com/webtools/gzip-compression.
