Setting up SMTP (Simple Mail Transfer Protocol) will help you increase your email deliverability rates as you use the proper authentication method or “industry standard” for sending emails. You’re probably here because:
- Your emails from your WordPress site aren’t being delivered.
- Your web host has the WP Mail function disabled.
In either case, you’ve come to the right place. Setting up SMTP authentication is an easy task and will fix the issue of your WordPress site not sending password retrieval emails, user signup notifications, email notifications, contact form submissions to your inbox, and more.
- Web Host Disabled the PHP wp_mail() Function
- What is SMTP Authentication?
- Best WordPress SMTP Authentication Plugins
- Setting Up WP Mail SMTP WordPress Plugin
My Web Host Disabled the PHP wp_mail() Function
At the beginning of the year (2017), reports revealed that WordPress is used by nearly 30% of all websites in the world. What does this mean? Being the most popular isn’t always the best.
Taking the podium as the fastest growing and most widely used Content Management System (CMS), this puts a huge target on any website’s back that’s using WordPress. Hackers target websites using WordPress 1) because of the sheer volume of people using the CMS 2) the diversity of websites using WordPress and 3) it’s Open-Source with thousands of developers contributing to the plugin and theme ecosystem. Despite its popularity, WordPress is still a safe and secure CMS. One must be proactive in making sure themes and plugins are always updated to their latest version and that the themes and plugins installed on a site are from credible sources/developers.
Now, why has your web host disabled the PHP wp_mail() function that WordPress uses by default? WordPress uses this function by default; to send password reset emails, WooCommerce sales notifications, comment notifications, form field submissions, etc. If the wp_mail() function is not disabled by your web hosting provider and an attacker gains access to your WordPress website, that attacker can send thousands of spam emails from your website without you even knowing.
Often times, consumers aren’t aware of this until it’s too late. An attacker will have already managed to send out thousands of spam emails from your account. This would consequently result in your web hosting provider suspending your account for spam. It’s also very likely that you end up being the culprit for getting both your server’s mail IP and domain added to blacklists.
With that said, if your web hosting provider has disabled the wp_mail() function, you’ll need to set up SMTP Authentication on your WordPress website. This can easily be achieved by using a handful of different plugins. Continue reading below to learn how to set up and configure a plugin on your WordPress site.
What is SMTP Authentication?
You may be asking yourself What is SMTP Authentication? and why is SMTP Authentication better than wp_mail()? Every time an email is sent it will be identified with the username and password associated with that particular email account the email is being sent from. If these credentials are correct, the email is accepted and gets processed/relayed to the intended recipient. This ensures that all outgoing email is sent from an authenticated source.
Setting up SMTP Authentication is also more secure. It helps prevent spammers from using your accounts to send bulk mail through your server.
Best WordPress SMTP Authentication Plugins
The WordPress marketplace and ecosystem is flooded with a variety of choices for SMTP Authentication plugins to choose from. We’ve put together a list of SMTP authentication email plugins we recommend to our customers:
- WP Mail SMTP by WPForms
- Easy WP SMTP by wpecommerce
- WP Mail SMTP Plugin by Mail Bank
- SMTP by BestWebSoft
- Gmail SMTP by naa986
Setting Up WP Mail SMTP Authentication Plugin
We’ve been using WP Mail SMTP for quite some time now and have never run into any issues. Any of the SMTP plugins listed above are great alternatives. In this article though, we’re going to walk you through the steps on how to set up the WP Mail SMTP WordPress plugin on your website. It doesn’t take long and is beginner friendly.
Before getting started you’ll want to make sure that you’ve created an email account. If you have not created an email account you can do so by following this knowledgebase article on how to create an email account.
Now that you’ve created an email account you can install the WP Mail SMTP plugin inside of your WordPress dashboard.
Log into your WordPress site and navigate to Plugins > Add New.

Search for WP Mail SMTP in the search field box in the upper right of the page. Click the Install Now button and then Activate button when it finished installing.


Now that the WP Mail SMTP authentication plugin has been activated, you’ll want to navigate to Settings > Email to configure the plugin.

At the top of the page you’ll be asked to fill in the From Email, From Name, and make sure to check the radio bubble for Send all WordPress emails vis SMTP. The From Email is the new email account you’ve created inside of your control panel.

Next, you’ll be asked to fill in your SMTP Options. The SMTP Host is the hostname of the server your website is hosted on. Your server’s hostname can be found in the Welcome email we sent to you when you first signed up. In this example, we’re going to use ph100.peopleshostshared.com as the SMTP Host.
Use port 587 for the SMTP Port field box. This is for TLS encryption (recommended). If you choose to use SSL encryption, you’ll want to use port 465. Make sure to check the radio bubble for Yes: Use SMTP Authentication.
For the Username you’ll enter your newly created email account (the full email address) and Password will be the password you created with the new email account.

If you’ve configured your settings correctly, you’ll see true when you send a test email. The output will look something like:
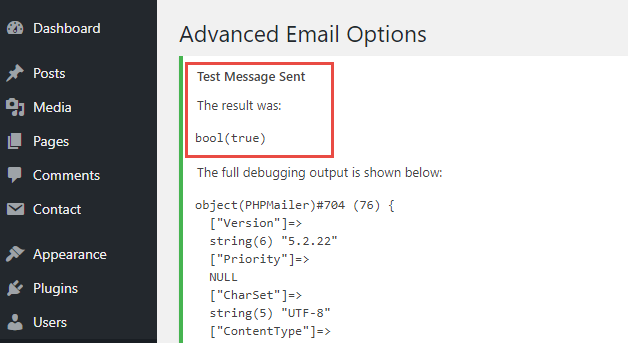
Make sure to click the save button once you’ve configured the WP Mail SMTP settings. After testing and seeing the true output, your WordPress website is now configured to authenticate via SMTP.