FTP, an acronym for File Transfer Protocol, is a popular method used to transfer files between two remote computers or servers. You’ve probably encountered FTP before, knowingly or unknowingly, when you’ve download files from the web or practiced connecting to a server using an FTP client in the past.
SFTP, an acronym for SSH File Transfer Protocol, is a separate protocol that allows you to transfer files over a secure connection. Please note, SFTP only works with your main (default) cPanel account. When you’re hosting account is provisioned, a default username is created. This is included in your Welcome email and is your cPanel and FTP username.
Connecting to your account via SFTP also requires shell access to your hosting account. If you are unsure whether or not you have shell access, please contact support. If you are a PeoplesHost customer, you have shell access.
1. Obtain and Manage Your SSH Keys
You’ll first need to generate a public key and obtain your Private Key from inside of your cPanel account. Follow the instructions below to log into cPanel and manage your SSH keys.
Log into cPanel using the cPanel credentials sent to you when you first signed up. These credentials can be found inside of your Welcome email.
After logging into cPanel you will want to search for the SECURITY heading. In that section will be an icon for SSH Access. Click this icon.

On the next page click the blue Manage SSH Keys button. If you already have a public and private key pair you’ll want to use those keys. Otherwise, use this page to generate a new key. We’ll be going through the process of generating a new Public Key in this walkthrough.

Click the blue Generate a New Key button.

By default, the system will automatically suggest the Key Name id_rsa, which you can change to your liking. We’ve named ours phkey. Enter in your Key’s password or use the Password Generator, and be sure to save that password in a safe place.
Choose RSA for Key Type and 2048 for Key Size and click the Generate Key button. A new page will load with a success message Key Generation Complete! . Click the Go Back link to return to the Manage SSH Keys page.

Now, you’ll need to Authorize the new key. On the Manage SSH Keys page click the Manage button and then the Authorize button on the next page.


After Authorizing the public key, you’ll need to make your way back to the Manage SSH Keys page by clicking the Go Back button. On the bottom of the page is a section for Private Keys. You will want to View/Download your Private Key to use with the FTP Client to connect via SFTP to the server.


Be sure to save your Private Key to a safe place on your device.
2. Configure Your FTP Client
One of the most widely used FTP clients is FileZilla. If you are unfamiliar with setting up and configuring FileZilla to connect to an FTP server, you can follow these instructions on how to connect to FTP using your PeoplesHost hostname and login credentials.
Connect via SFTP Using FileZilla
In this walkthrough we’re going to use FileZilla. First, you’ll want to Add your Private Key to FileZilla by navigating to Edit > Settings.

A pop up will appear. Select SFTP and click the Add key file… button. Select the Private Key you saved to your device in the previous step.

You may receive a warning that your key is not in a format supported by FileZilla. Press YES to convert it into a supported format. Enter the Private Key password you used when you Generated your Key inside of cPanel in the previous step.


FileZilla will prompt you to save the new *.ppk file to your device. After saving the newly converted *.ppk file, you’ll see it added to your Private Keys list in FileZilla.

Now that you’ve added your Private Key, you’ll want to navigate to FileZilla’s File > Site Manager.

Click the New Site button to add your account.

Enter your SFTP Connection details. Make sure you are using port 8022. After clicking the Connect button a prompt will appear requiring your Private Key password.
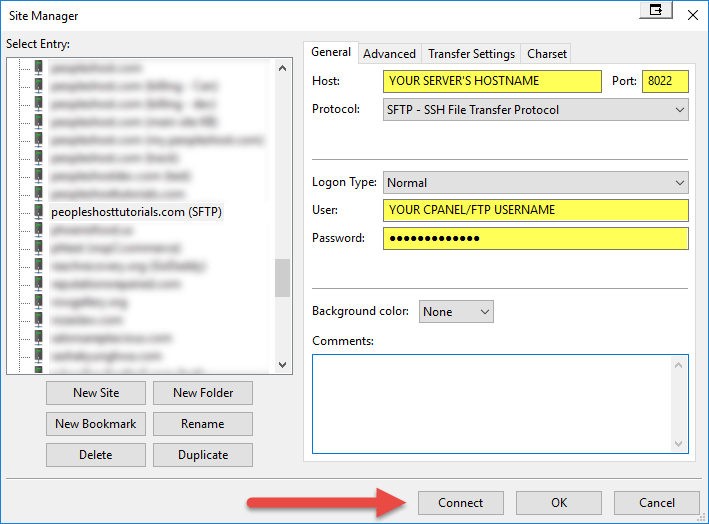

You may receive a warning dialog for Unknown Host Key. If you see this message, check the box for Always trust this host, add this key to the cache and press the OK button.

If you have followed these steps and connected via SFTP you should see the success output in the status section of FileZilla. It will look similar to the following image:
