Uploading your website’s files can be achieved many different ways. In this article, we’re going to walk you through the steps on how to upload your website’s files using the File Manager located inside of cPanel. For those of you who are unfamiliar with cPanel, it is a Linux based control panel that provides a friendly user interface for you to manage your hosting account.
- Log into cPanel Control Panel
- Access the File Manager
- Compress (.zip) Your Website Files
- Upload the Compressed (.zip) File
- Extract Website Files
1. Log into cPanel Control Panel
First, you’ll want to log into cPanel where you’ll access the File Manager. To log into cPanel, you’ll want to use the cPanel information that was provided to you in the Welcome email after you signed up. Scroll down to the Control Panel information heading for your cPanel details.
Your cPanel login page should look something like below:

2. Access the File Manager
After logging into cPanel, locate the File Manager icon under the FILES heading. This will open a new tab in your browser, which will load the File Manager user interface.

By default, File Manager may first load with your home directory visible. You’ll want to make sure you’re inside of your public_html directory. Double click the public_html and you will be taken inside of that directory.
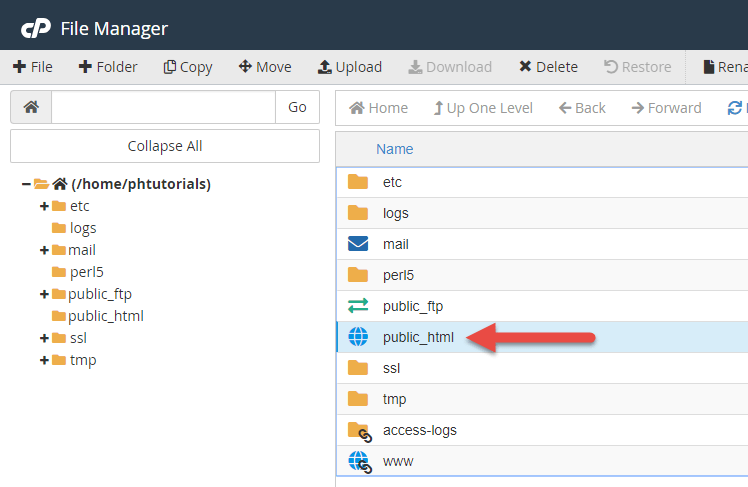
If your public_html directory is empty, that’s fine.
If your public_html has an existing index.html, you can delete that index.html or replace it with a new index.html and your website’s files.
3. Compress (.zip) Your Website Files
Now that you’ve managed to navigate to the File Manger interface, you’ll want to prepare your files to upload into File Manager. This will require you to compress (.zip) your files locally, which will allow you to upload one file (a .zip file) into File Manager and extract that .zip file in the next step.
As an example, your website’s files on your computer may look something like the below image:

Select your website files, right click your selection, click Send to > Compressed (zipped) folder.

You should see a .zip file appear in that folder on your computer. This .zip file contains the folders and files you compressed (zipped) into the .zip file that you will extract inside of File Manager in the next steps.

4. Upload the Compressed (.zip) File
Now that you’ve compressed your website’s files on your computer into one .zip file, open the browser you accessed File Manager with to upload the .zip file.
You should see a Upload button inside of File Manager, which will open a new browser tab for your File Upload.

Click the Select File button to select and upload the .zip file you just created on your computer. When you see the green 100% progress bar, you can click the Go Back to public_html link at the bottom of that page.


5. Extract Website Files
You will now see the .zip file sitting in the public_html directory that you uploaded using the Upload feature in the previous step.

Select this file and click the Extract button. A pop up will appear asking you where to extract the files. Make sure the location of the extraction is set to /public_html and click the Extract File(s) button. You will see the Extraction Results in a new pop up. Click the close button to be taken back to your public_html.


You should see the website files you just extracted sitting in your public_html directory. Feel free to delete the .zip file you uploaded. Make sure to choose Skip the trash and permanently delete the files when you delete any unwanted files or folders.

Now that you have successfully uploaded and extracted your website files into the public_html directory, you will be able to access your new website online.